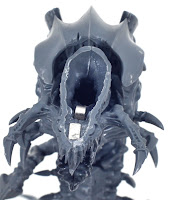
Once again Crazy Kage has the fix for which version of the big bug to build out of one kit: ALL OF THEM! The dilemma is that while you would like to field all three different versions of the new GW Trygon at some point, you have a limited amount of funds for a $50 model. We at Game Headz have never been stuck on the notion that YOU MUST BUILD THAT ONE AND ONLY VERSION! So here is our magnetized Trygon:
You’ll need:
GW Trygon model kit
CA super glue (we used thick Maxi-Cure)
Hobby knife
File set
Dremel or drill press with the proper sized bits
Eight 1/16”X1/32” magnet disc (D101-N50 from http://www.kjmagnetics.com/)
One 5/16" dia. x 3/16" or 5/16" dia. x 1/8" magnet disc (D53 or D52-N52)
Four 1/8" dia. x 1/32" magnet disc (D201-N52)
One 1/4" x 1/8" x 1/32" rectangle magnet (B4201)
About 18 more magnets for the arms if you really want to take it that far (we were too lazy and didn’t)
UNDERSTAND MAGNET POLARITY!! Before you go gluing magnets all over your fig, check how those are going to work on the thing. Opposites attract. Test fit and mark the ends that do not attract. This will save you time and frustration.
Another thing, our drill bits were a tad too small for some magnets so you would want to use you hobby knife or rounded file to open the holes up more.
After cutting the parts out and prepping them for assembly, break out your drill.
Let’s tackle the tail first. You could try and pin these parts in and honestly would be a simpler solution but we were afraid of ending up with a part that would not fit right and just swing around.
Drill a small hole at the tail base and at the tail parts so that the two magnets (D201) once fitted would meet up perfectly. This is a bit tricky because if you look close enough at the pic, you can see that there is this kind of ridge. This ridge must align with the two parts and if you haven’t made your magnet seat flush with the part this section will not look right. No big deal, just file the parts until they do fit. And if you poke a hole through the tail like I did, some Green Stuff or thick CA glue will take care of that.
Next, go ahead and assemble the rest of the tail along with the lower torso. You could if you wanted to go ahead and make a magnetized waist. We simply ran out of magnets that would be strong enough to hold the upper section’s weight but it would make for great poses and transport ease. We glued the upper torso on at this point.
Now the head, which took a bit of playing around with, came down to using just one really strong magnet to hold up the jaw and the mandible pinchers. We used the D52-N52. It took a small amount of filing to get it in but worked out better than we thought that it would. Glue the head together without the top and slide the magnet in with a glob of glue. Hold together the Trygon lower jaw and test fit it with head before the glue sets to make sure that you have a good fit.
Next open the Trygon jaw back up and place a D101 magnet inside with a good glob of glue and place the two halves together. Place the new assembly in the head where it goes. Leave it there for about a minute, this will let the magnet inside move to the proper polarity position without having to do all of the guesswork. Now assemble the Mawloc jaw with D101 magnets as shown, this will take some guesswork. Once assembled, they should stay in place reasonably well.
Go ahead and glue the head on to the body. Now you can drill the small holes for the pinchers. Check polarity of the D101’s to the D52 and then glue in place. The plastic is fairly soft and simply forcing them in was enough to keep them there but a spot of glue helps to. Don’t forget to do all sets and make sure that you have the right drill hole spot by test fitting first!
Finally let’s build on the crown. We placed the B4201 on the very from and a small D101 on one of the crowns. Come to find it, it really didn’t need it with the other crown part so this is entirely your call.
The decision was made not to make the back parts of the Mawloc magnetized, as the parts received from were incomplete, thanks GW! We did kinda mix up the talons for those WYSIWYG lawyers.
I hope this has been informative and will post pics of it whenever I get around to painting it after I get this IG Vulture finished that I have been working on.


